Showing posts with label Java. Show all posts

การเปลี่ยนแปลงจนถึง Java8

เป็นการสรุปที่อบรมมาค่ะ เอาแบบสั้นมากๆ

Java5

  • Fast Loop
for (int x : list)
  • Variable Argument 
public void doSomething (int... listInt)
  • Format (printf)
  • Enumeration ที่เป็น type safe
  • Autoboxing
  • Generic type
  • Annotation
  • Document annotation
  • Static import package
import static java.lang.math.*;

Java6

  • Script engine สามารถ run javascript ใน java ได้ ผ่าน class javax.script.ScriptEngine
  • String pool คือมีการรวมค่าของ string ที่เป็นค่าเดียวกันไว้ด้วยกัน (แต่ไม่ใช่ค่า string ตอน runtime)
String s1 = "Hello";
String s2 = "Hello"; // s1 = s2

String s3 = new String("Hello"); // s1 <> s3
String s4 = s3.intern(); // s1 == s4

Java7

  • String switcher คือใช้ string ในการเลือก case ได้
  • Literal underscore สามารถเพิ่ม _ เพื่อให้อ่านง่าย
long a = 127_777;
byte x = 0b0111_1111;
  • DiamondOp คือสามารถละ type ที่กำหนดใน generic class ได้
List b = new ArrayList<>();
  • Null safe มี java.util.Objects ที่เป็น utility สำหรับจัดการค่าที่สามารถเป็น null ได้ เช่น equals(), toString()
  • Multi-catch
try {
...
} catch (IndexOutOfBoundsException | NumberFormatException | ArithmeticException ex) {
    System.out.println(ex.getClass());
}

  • Try resource block
try (
/* create auto-closeable resource object (class that implements AutoCloseable interface) */
) {
...
} catch (Exception ex) {
...
}
  • Walk โดยการเพิ่ม FileVisitor ใช้กับ Files.walkFileTree
  • Watch โดยมี WatchService 
WatchService ws = FileSystems.getDefault().newWatchService();
Path p = Paths.get("temp");
p.register(ws, StandardWatchEventKinds.ENTRY_DELETE);

Java8

  • Interface สามารถสร้าง static method โดยจะต้องเป็น concrete method และเรียกผ่าน Interface ไม่ใช่เรียกที่ class
  • Interface สามารถสร้าง default method ที่เป็น concrete method ได้
  • Lambda ซึ่งจะถูกสร้างเป็น private method ใน class นั้นๆ (แม้ว่าจะคล้าย anonymous class) โดยใช้ annotation @FunctionalInterface เพื่อให้ compiler เช็คว่า interface เป็น SAM (Single Abstract Method) หรือเปล่า หรือจะใช้ predefined functional type (java.util.function.*) ก็ได้
  • Optional ซึ่งเป็น class ใหม่ เพื่อไม่ให้เกิด NullPointerException แต่ต้องใช้คู่กับ method orElse, orElseGet, orElseThrow หรือ ifPresent (ทั้งนี้จะใช้ Optional ก็จะต้องรู้เรื่อง Lambda ก่อน เพราะว่าหลาย method จะต้องใช้ความสามารถนี้)
  • Stream เป็น class ใหม่ และเพิ่ม method steam() ใน Collection และ Arrays เพื่อใช้ในการสร้าง stream หรือใช้ method of ของ Stream และเพิ่มค่าใน Stream โดย method add
Stream ss = Arrays.stream(array);

Stream sa = Stream.of(array);

Stream sd = Stream.generate(Math::random).limit(3); // สร้างค่าสุ่ม 3 ค่า

Stream sf = Files.lines(Paths.get("test.txt")); // สามารถอ่านจาก IO Stream ได้ด้วย

  • Parallel โดยสามารถใช้ได้บน Stream โดยแค่กำหนดเป็น Stream.parallel()
  • Parallel โดยใช้ class CompletableFuture

SCWCD สรุป

เพิ่งจะผ่านมาสอบมาหมาดๆ ค่ะ แต่ตอนที่อ่านก่อนสอบก็ทำสรุปไปด้วยเรื่อยๆ ตาม link ด้านล่างนะค่ะ


สำหรับสรุปนี้รวมมาจากหนังสือ Head First Servlet and JSP เป็นหลัก
มาทำ link รวมไว้ให้เผื่อใครจะสอบ ตอนที่สอบเป็นรหัส 310-083 นะค่ะ รู้สึกว่าจะเป็น J2EE 1.5 ค่ะ
ขอให้โชคดีกันนะค่ะ

Tomcat: setting SSL

การ setting SSL บน Tomcat สามารถทำได้ 2 แบบ คือ โดย JSSE กับ APR ซึ่ง APR จะใช้ OpenSSL เป็น engine ซึ่งมีความเป็น standard มากกว่า ไม่ติดว่าจะต้องเป็น Java เท่านั้น แต่ทั้งนี้การใช้ APR จะต้องใช้คู่กับ certificate file หรือ CA (certification authority) และไฟล์นี้ได้จากการขอผ่านทาง VeriSign หรือเวปอื่นๆ ที่ทำหน้าที่นี้โดยเฉพาะ เพื่อแสดงตัวตนของ server

ในที่นี้เราจึงขอข้ามไปไม่กล่าวถึง (เนื่องจากก็ยังไม่เคยลองทำจริงๆ เหมือนกันฮับ) ดังนั้นเรามาลอง set สำหรับใช้กันเล่นๆ ดูก่อนละกันนะค่ะ โดยใช้ JSSE ซึ่งทำได้ไม่ยากเลย สำหรับ JSSE เราก็ใช้คู่กับไฟล์เหมือนกัน แต่เป็นไฟล์ที่เรียกกันว่า keystore ซึ่งสำหรับคนที่ใช้ java อยู่แล้วจะมี tool ที่มากับ java ที่ใช้ในการสร้างไฟล์นี้ โดยใช้คำสั่ง

%JAVA_HOME%\bin\keytool -genkey -alias tomcat -keyalg RSA
จากนั้นใส่ password เป็น changeit (ซึ่งเป็น password default ที่ใช้กับ tomcat)

C:\Program Files\Java\jdk1.6.0_10\bin>keytool -genkey -alias tomcat -keyalg RSA
Enter keystore password:
Re-enter new password:
What is your first and last name?
[Unknown]:
What is the name of your organizational unit?
[Unknown]:
What is the name of your organization?
[Unknown]:
What is the name of your City or Locality?
[Unknown]:
What is the name of your State or Province?
[Unknown]:
What is the two-letter country code for this unit?
[Unknown]:
Is CN=Unknown, OU=Unknown, O=Unknown, L=Unknown, ST=Unknown, C=Unknown correct?
[no]: y

Enter key password for
(RETURN if same as keystore password):

ซึ่ง keytool จะทำการสร้างไฟล์ที่ชื่อ .keystore ไว้ที่ home directory ของเรา ในกรณีของ Windows มันก็จะสร้างไว้ที่ C:\Documents and Settings\username ซึ่ง Tomcat จะไปหาไฟล์ .keystore ที่ home directory โดย default ซึ่งเราไม่จำเป็นต้องกำหนดอะไรเพิ่มเติมอีก

หลังจากที่ได้ keystore มาแล้ว เราก็มาแก้ configuration ของ Tomcat เพื่อให้สามารถใช้ SSL ได้ โดยเพิ่ม config ในส่วนด้านล่างในไฟล์ conf\server.xml ซึ่งอยู่ใน Tomcat directory อีกที

<Connector port="8443" protocol="HTTP/1.1" SSLEnabled="true"
maxThreads="150" scheme="https" secure="true"
clientAuth="false" sslProtocol="TLS" />

สำหรับกรณีที่เราต้องการวาง .keystore ไว้ที่อื่นที่ไม่ใช่ home directory จะต้องมีการกำหนดเพิ่ม keystoreFile และ keystorePass attribute เ้ข้าไป เช่น

<Connector port="8443" protocol="HTTP/1.1" SSLEnabled="true"
maxThreads="150" scheme="https" secure="true"
keystoreFile=" E:\Program Files\Apache Software Foundation\Tomcat6.0\conf\.keystore"
keystorePass="changeit"
clientAuth="false" sslProtocol="TLS" />

*แต่เท่าที่ได้ลองทำดู ดูเหมือนใช้ไม่ได้ เหมือนกับ Tomcat ไม่ได้สนใจ keystoreFile กับ keystorePass เลย ไม่แน่ใจเหมือนกันว่าทำอะไรผิดหรือเปล่า ก็ลองทำดูนะค่ะ แล้วมาบอกกันบ้างก็จะดี อิอิ

เท่านี้ก็เป็นอันเสร็จในส่วนของ Tomcat แต่สำหรับ ตัว web application ซึ่งถ้่าเราอยากให้ web เราใช้ SSL จะต้องกำหนดไว้ใน web.xml ด้วย โดยกำหนด tag ไว้ (สำหรับใครที่ยังไม่่เข้าใจในการ set security constraint ของ web application แนะนำให้ลองหาหนังสือมาอ่านเอานะฮับ เพราะว่าเรื่องนี้เราต้องการเน้นเรื่องการ set บน Tomcat เท่านั้น)

</security-constraint>
...
<user-data-constraint>
<transport-guarantee>CONFIDENTIAL</transport-guarantee>
</user-data-constraint>
</security-constraint>


Reference:
Apache Tomcat 6.0 - SSL Configuration HOW-TO
Configuring Tomcat 6 For https (SSL) Page
Setting Up SSL on Tomcat In 3 Easy Steps

JSP - Custom Tag

<?xml version="1.0" encoding="UTF-8"?>
<taglib version="2.0" xmlns="http://java.sun.com/xml/ns/j2ee"
xmlns:xsi="http://www.w3.org/2001/XMLSchema-instance"
xsi:schemaLocation="http://java.sun.com/xml/ns/j2ee 
  http://java.sun.com/xml/ns/j2ee/web-jsptaglibrary_2_0.xsd ">
  <tlib-version>1.2</tlib-version>
  <short-name>NMTOKEN</short-name>

  <uri>DiceFunction</uri>

  <!-- สำหรับ Custom Tag -->
  <tag>
    <description>random advice</description>
    <name>advice</name>
    <tag-class>package.AdvisorTagHandler</tag-class>
    <body-content> empty | scriptlet | tagdependent </body-content>

    <attribute>
      <name>user</name>
      <required> true | false </required>
      <rtexprvalue> true | false </rtexprvalue>
      <type>int | java.lang.String | etc. </type>
    </attribute>
    [<attribute> ... </attribute>]
    <dynamic-attributes> true | false </dynamic-attributes>
  </tag>

  <!-- สำหรับ tag file -->
  <tag-file>
    <name>Header</name>
    <path>/META-INF/tags/Header.tag</path>
  </tag-file>

  <!-- สำหรับ function -->
  <function>
    <name>rollIt</name>
    <function-class>com.amadmonster.scwcd.el.function.DiceRoller</function-class>
    <function-signature>int rollDice()</function-signature>
  </function>

  <!-- สำหรับ function ที่รับตัวแปร -->
  <function>
    <name>rollWith</name>
    <function-class>com.amadmonster.scwcd.el.function.DiceRoller</function-class>
    <function-signature>int rollDice(int)</function-signature>
  </function>

</taglib>

Custom Tag

<name> ของ <tag> จะเป็นชื่อที่ใช้อ้างใน JSP
<body-content> ของ <tag> สามารถเป็น
  • empty - ไม่มี body
  • scriptless - สามารถเป็น static text, EL expressions, standard action และ custom tags ได้ แต่จะใส่ JSP scriptlet () ไม่ได้
  • tagdependent - ค่า EL จะไม่ถูกแปล และถูกส่งให้ Custom Tag เสมือน plain-text เพื่อให้แปลด้วย Custom Tag เอง

<tag-class> เป็นชื่อ Package และ Class ของ Tag Handler
<attribute> จะบรรยายลักษณะของแต่ละ attribute ของ Custom Tag
<rtexprvalue> จะบอกว่า attribute ตัวนี้สามารถรับเป็น อย่างอื่นที่ไม่ใช่ text ได้หรือไม่ (เช่น EL expression, custom tag, scriptlet) (default: falue)
<type>
เป็นชนิดของ attribute ซึ่งใส่เป็น fully-qualified class name ยกเว้น primitive data type ซึ่งใส่ได้ตรงๆ เช่น int, char ในกรณีที่ไม่ใส่ ค่าอะไรเลย default จะเป็น java.lang.String
<dynamic-attributes> ใช้ config ว่า tag นี้จะรับ attribute แบบ dynamic หรือไม่ ซึ่งถ้าเป็น true ตัว tag handler จะต้อง implement DynamicAttributes


สำหรับ Custom Tag สามารถ implement ได้ 2 แบบ แบบแรกคือการ Simple Tag ซึ่งจะ extend SimpleTagSupport และมี life cycle ดังนี้


แบบที่ 2 คือ แบบ Classic Tag ซึ่งจะ extend TagSupport หรือ BodyTagSupport ซึ่งสามารถแก้ไข body ของ tag ที่จะแสดงออกไปได้ ซึ่งมี life cycle ดังนี้


และ State Diagram ของ TagSupport และ BodyTagSupport ดังนี้


Reference:
Tag Library Descriptor

JSTL - JSP Standard Tag Library


TagAttributeUsage
c:outvalueString ของค่าที่ต้องการจะแสดงผล
escapeXmlไม่ render XML หรือ HTML แ่ต่จะแสดงผลเหมือนกับ String ปกติ
default: true
defaultค่า default เมื่อ value เป็น null ซึ่งสามารถใช้ได้เช่นเดียวกับ
<c:out value="some string">default value</c:out>
c:forEachvarชื่อของตัวแปรที่ไว้รับ element ในแต่ละ loop
itemsชื่อของตัวแปรตัวแปร array, Collection, Map หรือ comma-delimited String ซึ่งเก็บแต่ละ element สำหรับการวนลูป
varStatueชื่อของตัวแปร javax.servlet.jsp.jstl.core.LoopTagStatus ซึ่งสามารถนำมาหาค่าต่างๆ เช่น count ต่อไป เช่น
<c:forEach var="movie" items="${movieList}"
varStatus="movieLoopCount">
 <tr><td>Count: ${movieLoopCount.count} </td></tr>
</c:forEach>

c:forTokensvarชื่อของตัวแปรที่ไว้รับ element ในแต่ละ loop
itemsชื่อของตัวแปรตัวแปร array, Collection, Map หรือ comma-delimited String ซึ่งเก็บแต่ละ element สำหรับการวนลูป
varStatueชื่อของตัวแปร javax.servlet.jsp.jstl.core.LoopTagStatus ซึ่งสามารถใช้ได้เช่นเดียวกับ varStatus ของ c:forEach
delimsString ที่เป็นตัวคั่นในการแบ่งแต่ละ token เช่น
<c:forTokens items="${dataString}" delims="," var="item">
Next item - ${item}
</c:forTokens>
beginตัวแรกที่จะเริ่มใช้ใน loop
endตัวสุดท้ายที่จะใช้ใน loop
stepตัวถัดที่จะใช้ใน loop
c:iftestค่าที่เป็น boolean เพื่อใช้ทดสอบว่าจะทำคำสั่งใน c:if หรือไม่
c:choose
ตัวนี้ไม่มี attribute จะใช้ ร่วมกับ c:when และ c:otherwise
<c:choose>
 <c:when test="${userPref == 'performance'}">
   ...do something...
 </c:when>
 <c:when test="${userPref == 'safety'}">
   ...do something...
 </c:when>
 <c:otherwise>
   ...do something...
 </c:otherwise>
</c:choose>
c:whentestเหมือนกับ attribute test ของ c:if คือใช้ทดสอบเงื่อนไขในการทำงาน
c:otherwise
ตัวนี้ไม่มี attribute ใช้ร่วมกับ c:when ดังนี้
c:setvarตัวแปรที่ต้องการ set ค่า ในกรณีที่ไม่มีตัวแปรชื่อนี้ ตัวแปรนี้ก็จะถูกสร้างขึ้นมา
scopescope ของตัวแปร
  • page (default)
  • request
  • session
  • application
default: page
valueค่าที่ต้องการจะ set หรือสามารถใส่ค่านี้เป็น body ของ tag ก็ได้ เช่น
c:settargetbean หรือ Map ที่ต้องการจะ set ค่า
propertyชื่อ property ที่ต้องการจะ set ค่า
valueค่าที่ต้องการจะ set หรือสามารถใส่ค่านี้เป็น body ของ tag ก็ได้ เช่น
<c:set target="${person}" property="name">new name</c:set>
c:removevarตัวแปรที่ต้องการลบออก
scopescope ของตัวแปรที่ต้องการจะลบ
  • page (default)
  • request
  • session
  • application
default: page
c:importurlc:import จะใช้ได้เหมือน jsp:include แต่ว่าสามารถอ้างถึงไฟล์ได้ทั้งใน application และนอก web application โดยระบุ URL ของไฟล์ที่ต้องการจะใส่เข้ามา
c:paramnamec:param ใช้ในการส่งตัวแปรข้ามไปยัง included page เหมือนกับ jsp:param โดยระบุชื่อของตัวแปรที่ต้องการจะส่งไป
valueค่าของตัวแปรที่จะส่งไป ใช้ร่วมกับ c:import หรือ c:url ซึ่งค่าของตัวแปรก็จะ encodeUrl แล้ว และสามารถส่งได้อย่างถูกต้อง ตัวอย่างเช่น
<c:import url="Header.jsp">
 <c:param name="subTitle" value="any sub-title for this page" />
<c:import>
c:urlvaluepath และ file ที่ต้องการจะ link ไป โดย c:url จะจัดการเรื่อง session ให้อัตโนมัติ เช่นในกรณีที่ client ไม่รับ cookies มันจะใส่ session id ต่อท้าย url ให้อัตโนมัติ แต่มันจะไม่ได้ทำ encodeUrl ให้ดังนั้นถ้าใน URL มีค่าตัวแปรที่เป็นอักขระพิเศษสำหรับ HTML เช่น space ก็จะทำให้ error ได้
c:redirecturlurl ที่จะ redirect ไป ซึ่งจะมีการ rewrite URL เพื่อจัดการ session ให้อัตโนมัติ
c:catchvarสำหรับใส่ code ที่เสี่ยงจะ throw exception ถ้ามี exception เกิดขึ้น มันจะข้าม block ของ c:catch ไปทำคำสั่งต่อจากนั้นเลย และ property var เป็นชื่อของตัวแปร exception ซึ่งจะใช้หลังจาก c:catch ได้ เช่น
<c:catch var="ex">
 <% int x = 1/0 %>
</c:catch>
If error occurs with ${ex}
*ที่เขียน c:set แยกออกมาเพราะว่ามันสามารถ set ได้ทั้ง ตัวแปร และ Bean หรือ Map ซึ่งจะใช้ property ที่ต่างกันจึงเขียนแยกกันเพื่อความเข้าใจง่าย


Reference:
JSTL Reference Documentation
Setup Jstl for Jsp2

Java App: Send Keystoke to Windows

สำหรับการส่งการกด keyboard โดยผ่านทาง java นะค่ะ ง่ายๆ เราใช้ java.awt.Robot เป็นตัวช่วยในการส่ง keystoke ตัวอย่างด้านล่างเป็นแค่ส่วนหนึ่งของ program ที่ดึงมาให้ดูเฉพาะส่วนที่ต้องการส่ง keystoke นะค่ะ


import java.awt.AWTException;
import java.awt.Robot;
import java.awt.event.KeyEvent;

...
try {
Robot robot = new Robot();
// ส่ง key A ไป
robot.keyPress(KeyEvent.VK_A);
} catch (AWTException e) {
e.printStackTrace();
}
...


Reference:
Sending keystrokes to GUI applications

Java App: Send SMTP Mail Example

การส่งเมล์โดยใช้ java สามารถใช้ class ใน javax.mail ได้ ซึ่งตัวอย่างข้างล่างเป็น utility ที่สามารถเรียกใช้ได้เลย

MailUtility.java

package com.amadmonster.util.mail;

import java.util.Date;
import java.util.Properties;

import javax.mail.Message;
import javax.mail.MessagingException;
import javax.mail.Session;
import javax.mail.Transport;
import javax.mail.internet.AddressException;
import javax.mail.internet.InternetAddress;
import javax.mail.internet.MimeMessage;

import org.apache.log4j.Logger;

public class MailUtility {
/** Get logger. */
private static Logger logger = Logger.getLogger(MailUtility.class);
Properties props;

public MailUtility(String smtpServer) {
props = System.getProperties();
props.put("mail.smtp.host", smtpServer);
}

public void sendMail(String to, String from, String subject, String body) throws MailUtilityException {
Session session = Session.getDefaultInstance(props);
session.setDebug(false);

Message msg = new MimeMessage(session);
try {
msg.setFrom(new InternetAddress(from));
msg.setRecipients(Message.RecipientType.TO, InternetAddress.parse(to, true));
msg.setSubject(subject);
// check mime type from Web: Content Type
msg.setContent(body, "text/plain");
msg.setText(body);
msg.setSentDate(new Date());
// -- Send the message --
Transport.send(msg);
logger.info("Message sent OK.");

} catch (AddressException e) {
throw new MailUtilityException("Incorrrect address format", e);
} catch (MessagingException e) {
throw new MailUtilityException("Error occurs when sending mail", e);
}

}
}

MailUtilityException.java


package com.amadmonster.util.mail;

public class MailUtilityException extends Exception {

public MailUtilityException(String message, Throwable cause) {
super(message, cause);
}

public MailUtilityException(String message) {
super(message);
}

public MailUtilityException(Throwable cause) {
super(cause);
}

}


Reference:
JavaMail quick start

Java App: Windows Command Line Example

สำหรับการ run command line ผ่านทาง Java นั่นสามารถใช้ method Runtime.getRuntime().exec() ได้ แต่ว่าจะ run ตรงๆ ไม่ได้ จะต้องส่ง C:\WINDOWS\system32\cmd.exe /y /c ไปก่อน ตัวอย่างข้างล่างเป็นการเขียน utility class เพื่อที่จะนำไปใช้ต่อไปได้

CommandUtility.java


package com.amadmonster.util.command;

import java.io.*;
import java.util.ArrayList;
import java.util.Arrays;
import java.util.List;

import org.apache.log4j.Logger;

public class CommandUtility {
static Logger logger = Logger.getLogger(CommandUtility.class);
private int status; // return command status, 0 - normal exit

/**
* Run Window command on specific working directory.
* @param command Array of command string and option.
* @param workDir String of working directory.
* @throws CommandUtilityException
*/
public void runCommand(String[] command, String workDir) throws CommandUtilityException {
String[] cmd = { "C:\\WINDOWS\\system32\\cmd.exe", "/y", "/c" };
List cmdList = new ArrayList();
cmdList.addAll(Arrays.asList(cmd));
cmdList.addAll(Arrays.asList(command));

Process p;
try {
p = Runtime.getRuntime().exec(cmdList.toArray(new String[0]), null,
new File(workDir));

logCommandInputStream(p);
logCommandErrorStream(p);
setStatus(p.exitValue());

if (getStatus() != 0) {
throw new CommandUtilityException("Fail to run command.");
}

} catch (IOException e) {
// TODO Auto-generated catch block
throw new CommandUtilityException("Fail to run command.", e);
}

}

private void logCommandInputStream(Process p) throws IOException {
InputStream is = p.getInputStream();
InputStreamReader isr = new InputStreamReader(is);
BufferedReader br = new BufferedReader(isr);
String line;
while ((line = br.readLine()) != null) {
logger.info(line);
}

}

private void logCommandErrorStream(Process p) throws IOException, CommandUtilityException {
InputStream is = p.getErrorStream();
InputStreamReader isr = new InputStreamReader(is);
BufferedReader br = new BufferedReader(isr);
String line;
while ((line = br.readLine()) != null) {
logger.error(line);
}

}

/**
* Run Window command on specific working directory.
* @param command Command string.
* @param workDir String of working directory.
* @throws CommandUtilityException
*/
public void runCommand(String command, String workDir) throws CommandUtilityException {
String[] cmd = { command };
runCommand(cmd, workDir);
}

/**
*
* @return int Status of running command, 0 - normal
*/
public int getStatus() {
return status;
}

/**
*
* @param status Exit command status
*/
private void setStatus(int status) {
this.status = status;
}

}


CommandUtilityException.java

package com.amadmonster.util.command;

public class CommandUtilityException extends Exception {

public CommandUtilityException(String message, Throwable cause) {
super(message, cause);
}

public CommandUtilityException(String message) {
super(message);
}

public CommandUtilityException(Throwable cause) {
super(cause);
}

}


Reference:
When Runtime.exec() won't

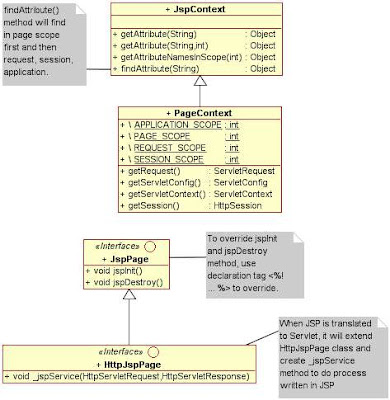
JSP - Quick Reference

JSP Tag
Tag สำหรับ JSP ที่ใช้มีดังนี้

scriptlet - <% ... %> เป็นพื้นฐานของ JSP เลย เราสามารถเขียน code java ลงไปในนี้ได้
XML-compliant ที่ใช้แทน <% list.add("Fred"); %> จะเป็นดังนี้

<jsp:scriptlet>
list.add("Fred");
</jsp:scriptlet>

directive - <@% ...%>
DirectiveAttributeUsage
pagecontentTypeกำหนดการเข้ารหัสตัวอักษรหรือ MIME type ของ response ในกรณีที่ไม่ได้กำหนดค่าจะใช้ค่าจาก pageEncoding attribute

default = "text/html;charSet=ISO-8859-1"
importimport class อื่นเข้ามาใช้งาน

XML-compliant: <jsp:directive.page import="path/file" />
isThreadSafeถ้าเป็น "true" แปลว่า Servlet ที่ได้ หลังจาก translate JSP แล้วจะ implement SingleThreadModel เพื่อให้ Servlet เป็น thread safe (ซึ่งการทำงานจริงๆ ของ SingleThreadModel ขึ้นอยู่กับ Web Container แต่ละเจ้า จะ implement เป็นแบบไหน ซึ่งโดยลึกๆ แล้ว ไม่ค่อยได้ประโยชน์เท่าไร)
errorPageurl ของ exception page
isErrorPageบอกให้รู้ว่า JSP page ปัจจุบันเป็น errorPage หรือไม่ ถ้าเป็น "true" ก็จะมี implicit object exception ถ้าเป็น "false" ก็จะไม่สามารถใช้ object exception ใน page นี้ได้

default = "false"
isELIgnoredบอกว่าจะไม่สามารถใช้ Expression Language ใน JSP นี้ได้
languagedefine scripting language ที่ใช้ใน scriptlet และ declaration
default = Java
extendsกำหนด class ที่ JSP นี้จะ extend ซึ่งโดยปกติ จะึขึ้นอยู่กับ web containner ดังนั้นถ้าเราต้องการจะ extend ตัวอื่นจะต้องกำหนดไว้ แต่ควรจะแน่ใจจริงๆ ว่ามันทำงานได้นะจ๊ะ
sessionกำหนดว่าเอกสารนี้จะใช้ implicit object session หรือไม่ สามารถกำหนดเป็น session="false" ถ้าไม่ต้องการใช้ session

default = "true"
bufferควบคุมการใช้ buffer สำหรับ jsp ว่าต้องการ buffer หรือไม่ ค่าเริ่มต้นจะอยู่ที่ 3 KB
autoFlushเมื่อ buffer เต็มจะ cleart buffer ให้อัตโนมัติ

default = "true"
infoสามารถกำหนดเป็นค่า string ใดๆ ซึ่งจะเก็บไว้ใน servlet ที่ได้ translate จาก JSP และสามารถดึงขึ้นมาโดย Servlet.getServletInfo()
pageEncodingบอกว่า page JSP encode ด้วยรหัสอะไร ในกรณีที่ไม่กำหนดค่าจะใช้ค่าจาก contentType attribute

default = "ISO-8859-1"
includefileชื่อไฟล์ที่ต้องการนำมา include (ไฟล์ servlet ที่ได้จะเสมือนเอา included file มาแปะไว้กับ servlet เลย)
taglibtagdirdirectory ที่เก็บ tag file ไว้ (จะใช้ในกรณีที่ไม่ได้ declare tag file ไว้ใน tld)
prefixชื่อที่ใ้ช้ในการเรียก tag lib นี้ ซึ่งเป็นค่าอะไรก็ได้ ยกเว้น jsp, jspx, java, javax, servlet, sun, sunw
uriชื่อที่ต้องใช้ให้ตรงกับไฟล์ Tag Library Descriptor (TLD)
tag
*ใช้สำหรับ tag file เท่านั้น
importimport class อื่นเข้ามาใช้งาน
isELIgnoredบอกว่าจะไม่สามารถใช้ Expression Language ใน JSP นี้ได้
languagedefine scripting language ที่ใช้ใน scriptlet และ declaration

default = Java
body-contentมีค่าได้ดังนี้
  • scriptless - ไม่รับ JSP scriptlet แต่สามารถรับเป็น EL expression ได้
  • tagdependent - รับ body เสมือนว่าเป็น string
  • empty - ไม่รับ body
สังเกตว่า ไ่ม่มี JSP ในนี้ นั่นคือใน body ของ tag จะไม่สามารถเป็น scriptlet ไำด้
dynamic-attributesชื่อของ dynamic attribute ซึ่งจะรับเป็น HashMap เป็นชื่อและค่าของ attribute
attribute
*ใช้สำหรับ tag file เท่านั้น
nameชื่อของ attribute ที่รับเข้ามา
requiredเป็นค่า boolean เพื่อบอกว่าเป็น attribute ที่ต้องมีเสมอหรือไม่
rtexprvalueค่า boolean ที่บอกว่าจะ สามารถรับเป็น scriptlet ได้หรือไม่
variable
*ใช้สำหรับ tag file เท่านั้น
name-givenชื่อของตัวแปร
variable-classclass ของตัวแปร เช่น java.lang.String

expression - <%= ... %> ใช้แทน out.print() ในการแสดงผล
XML-compliant ที่ใช้แทน <%= it.next %> จะเป็นดังนี้

<jsp:expression>

it.next()
</jsp:expression>

declaration - <%! ... %> ใช้สำหรับ declare instance variable หรือ method
XML-compliant ที่ใช้แทน <%! int y = 3; %> จะเป็นดังนี้

<jsp:declaration>

int y = 3;
</jsp:declaration>

XML-compliant คือการทำให้ JSP page เป็น JSP document ความแตกต่างของสองอันนี้ก็คือ JSP document จะเป็น XML-compliant คือเป็น well-formed XML ซึ่งโดยปกติแล้ว เราจะไ่ม่ได้เขียน JSP document เอง แต่อาจจะใช้ tools ในการสร้างขึ้นมา ตัวอย่างอีก ตัวอย่างหนึ่งสำหรับ XML-compliant ก็คือการเขียน text บน JSP page ซึ่งจะใช้ตัวอย่างด้านล่างแทน

<jsp:text>

This is text.
<jsp:text>

สำหรับ comment สามารถใช้ comment ใน html คือ <!-- comment --> หรือใช้ JSP comment <% /* comment */ %> ก็ได้ แต่ถ้าใช้ html comment ข้อความก็จะถูกส่งไปที่ client เสมือนกับ html comment ทั่วไป แต่สำหรับ JSP comment จะถูกตัดทิ้งไปเมื่อ translate จาก JSP เป็น Servlet


JSP Implicit Object


APIImplicit ObjectUsed by Servlet
JspWriteroutresponse.getWriter()*
* it will get PrintWriter, not JspWriter
HttpServletRequestrequestrequest*
* depend on how to declare parameter name in service method
HttpServletResponseresponseresponse*
* depend on how to declare parameter name in service method
HttpSessionsessionrequest.getSession()
ServletContextapplicationgetServletContext()
ServletConfigconfiggetServletConfig()
Throwableexception
PageContextpageContextN/A
Object
pageN/A
page scope is not available in Servlet

tag file ก็สามารถใช้ implicit object ตัวเดียวกับ JSP file ได้เหมือนกัน ยกเว้น ServletContext ซึ่งใน tag file จะใช้เป็น jspContext ซึ่งเป็น JspContext object แทน และไม่สามารถใช้ application ซึ่งเป็น ServletContext object ได้

EL Implicit Object

Implicit ObjectUsed by Scriplet
${pageScope.name}N/A
page scope is not available in Servlet
${requestScope.name}request.getAttribute("name")
${sessionScope.name}session.getAttribute("name")
${applicationScope.name}application.getAttribute("name")
${param.name}request.getParameter("name")
${paramValues.name[index]}request.getParameterValues("name")[index]
${header.name}request.getHeader("name")
${headerValues.name[index]}
Enumeration headers
= request.getHeaders("name");
int i = 0;
while (headers.hasMoreElements()) {
if (i == index) {
String s = (String) headers.nextElement();
}
i++;
}
${cookie.name}
Cookie[] cookies = request.getCookies();
for (int i = 0; i < cookies.length; i++) {
if ((cookies[i].getName()).equals("name")) {
Cookie s = cookies[i];
}
}
${initParam.name}application.getInitParameter("name")
${pageContext.name}pageContext.getName() เช่น pageContext.exception ซึ่งเป็นตัวแปรเดียวกับ exception ใน JSP Implicit Object ซึ่งจะสามารถ access ตัวแปรนี้ได้จะต้องกำหนดให้*
<%@ page isErrorPage="true" %>

*แต่ไปลองดูแล้วกับ Tomcat 6, Servlet 2.5 ปรากฎว่าถึงไม่ใส่ ก็สามารถ access ตัวแปรได้นะ ไม่แน่ใจเหมือนกัน

ซึ่ง pageScope, requestScope, sessionScope, applicationScope สามารถละไว้ได้ถ้าในกรณีที่เราไม่ต้องการระบุว่าจะใช้ attribute จาก scope ใด

${requestScope.person.name} --> ${person.name}

ยกเว้นถ้าในกรณีที่มี attribute ชื่อเดียวกันในหลาย scope และต้องการระบุว่าต้องการจาก scope ไหน หรือในกรณีที่ชื่อของ attribute ไม่เป็นไปตาม Java naming rule เช่น

request.setAttribute("foo.person", p); // ซึ่ง เราไม่สามารถใช้ ${foo.person.name} ได้

${requestScope["foo.person"].name}

EL Operation

Arimetic uses + , - , *, / or div, % or mod
Logical uses && or and, || or or, ! or not
Relational uses == or eq, != or ne, < or lt, > or gt, <= or le, >= or ge


EL Function

ใช้การกำหนด function ใน Tag Library Descriptor (TLD) file โดยเรียก public static method ใน class

<?xml version="1.0" encoding="UTF-8"?>
<taglib version="2.0" xmlns="http://java.sun.com/xml/ns/j2ee" xmlns:xsi="http://www.w3.org/2001/XMLSchema-instance" xsi:schemaLocation="http://java.sun.com/xml/ns/j2ee http://java.sun.com/xml/ns/j2ee/web-jsptaglibrary_2_0.xsd ">
<tlib-version>1.2</tlib-version>
<short-name>NMTOKEN</short-name>

<uri>DiceFunction</uri>
<function>
<name>rollIt</name>
<function-class>com.amadmonster.scwcd.el.function.DiceRoller</function-class>
<function-signature>int rollDice()</function-signature>
</function>

<!-- สำหรับ function ที่รับตัวแปร -->
<function>
<name>rollWith</name>
<function-class>com.amadmonster.scwcd.el.function.DiceRoller</function-class>
<function-signature>int rollDice(int)</function-signature>
</function>
</taglib>

นอกจาก tld file จะประกอบด้วย EL Function แล้วยังสามารถใส่ custom tag ด้วย แต่จะกล่าวในตอน JSTL & Custom Tag ต่อไป

Standard Action
ActionAttributeUsage
jsp:useBeanidเป็น identifier ของ object โดยรับเป็น string name ของ JavaBean นั้นๆ ซึ่งจะแปลเป็น servlet โดยใช้ getAttribute หรือ setAttribute method ดังนั้นจึงเป็น case sensitive
scopeเป็น scope ที่ใช้ในการอ้างอิงถึง JavaBean นั้น มีค่าได้ดังนี้
  • page: ใช้ใน page นั้นๆ (default)
  • request: ใช้ในการ request ครั้งหนึ่งๆ เป็น attribute ของ request
  • session: ใช้ใน session นั้นๆ เหมือนกับ attribute ของ session
  • application: ใช้ได้ทุกๆ servlet เหมือนกับ attribute ของ applicationContext
default: page
classclass ของ bean ที่จะถูกสร้างขึ้นในกรณีที่ attribute นั้นๆ ไม่มีอยู่ใน scope ที่ ซึ่งไ่ม่สามารถกำหนดเป็น interface หรือ abstract class ได้

property นี้เป็น optional คือไม่จำเป็นต้องมีก็ได้ ซึ่งใช้ในกรณีที่เราต้องการดึงค่า attribute ขึ้นมาใช้ แต่ในกรณีที่ไม่มี attribute อยู่จะทำการสร้าง bean เพื่อจะ add attribute ก็จะ error InstantiationException
typeType ของ bean ในกรณีที่จะถูกสร้างขึ้น เมื่อไม่มีอยู่ใน scope ซึ่งอาจจะเป็นค่าเดียวกับ class property หรือว่าเป็น parent object ของ class property หรือว่าเป็น interface ก็ได้

ในกรณีที่ไม่ได้กำหนด จะถือว่าเป็นค่า default คือ เหมือนกับ class
beanNameชื่อของ Bean
jsp:setProperty

สามารถใส่ไว้ใน body ของ jsp:useBean ได้ กรณีที่ต้องการให้ set property เมื่อมีการสร้าง bean ใหม่ (ในกรณีที่มีอยู่แล้วจะไม่ set)
nameชื่อของ Bean (เป็นค่า property id ใน action jsp:useBean นั้นเอง) ที่เรา้้จะ set ค่า
propertyชื่อ property ที่เราต้องการจะ set ค่า ถ้าให้ค่าเป็น "*" คือ ให้ map ชื่อ property กับ parameter ของ request object ที่ชื่อตรงกัน
valueค่าที่จะ set ใหักับ property นั้นๆ (ถ้ามีการ set ค่าใช้กับ param attribute ก็จะต้องไม่มีการ set ค่ากับ value อีก
paramชื่อ parameter ที่จะให้ค่ากับ property นั้นๆ ในกรณีนี้จะไม่ใส่ property value หรือในกรณีที่ไม่ใส่ัทั้ง value และ param แสดงว่า param เป็นค่าเดียวกับ property (หรือให้ใช้ param ที่มีค่าเดียวกับ property สำหรับ set ค่า)
jsp:getPropertynameชือของ object Bean (ค่า property id ใน action jsp:useBean นั้นเอง) ที่เราต้องการจะรับค่า
propertyproperty ที่เราต้องการจะรับค่า
jsp:forwardpagerelative url ที่ต้องการ forward ไป ซึ่งจะเป็น JSP, servlet หรือ dynamic file อื่นๆ ก็ได้ ที่อยู่ใน application เดียวกัน
jsp:includepagerelative url ที่จะ include (jsp:include ให้ผลเหมือนกับ directive include แต่ว่าจะทำเมื่อ runtime สำหรับในกรณีที่ included file ยังมีการเปลี่ยนแปลงอยู่)
jsp:paramnameชื่อตัวแปรที่ต้องการ forward ไปพร้อมกับ jsp:forward หรือ jsp:include เช่น
<jsp:include page="Header.jsp">
<jsp:param name="subTitle"
value="Customized Title">

</jsp:include>
valueค่าของตัวแปรตามชื่อที่ต้องการส่ง
jsp:attributenameชื่อของ attribute ซึ่งตัวนี้มี body ด้วยเป็นค่าของ attribute เช่น
<jsp:attribute name="user">${userName}</jsp:attribute>
jsp:attribute สามารถใส่ใน custom tag body ได้ ถึงแม้ว่าจะกำหนด <body-content>empty</body-content>
jsp:doBody
*ใช้สำหรับ tag file เท่านั้น

สำหรับ tag file เพื่อดึงค่า body ของ tag


Reference:
JSP 2.0 Syntax Reference

Servlet: Listener

listener class เป็นคลาสที่มีลักษณะเป็น event-driven คือ method ที่อยู่ใน listener จะต้องถูกเรียกโดยอัตโนมัติ มีการเหตุการณ์เกิดขึ้น ซึ่งแต่ละ class ก็จะ support event ที่แตกต่างกันไป


ที่เราเห็นใช้กันบ่อยหน่อย ก็คงจะเป็น ServletContextListener ซึ่งจะ support event ที่เกี่ยวกับการ initialize และ destroy context หรือเมื่อเรา deploy application เราขึ้นไปบน web container หรือตอนที่ เรา undeploy หรือตอนที่ server start หรือ clash ก็จะมีการเรียก class นี้ไปใช้ ส่วน ServletContextAttributeListener ก็จะเป็นคลาสที่ทำงานเมื่อการมี add, remove, replace attribute เข้าไปที่ context (ดังนั้นจะต้องเป็น attribute ที่เป็น context scope เท่านั้น)

ส่วน ServletRequestListener และ ServletRequestAttributeListener ก็จะคล้ายกัน คือ สำหรับเมื่อมี request เกิดขึ้น หรือก่อนที่ request จะจบ และเมื่อมีการเปลี่ยนแปลงของ attribute ใน request (page scope)

ส่วนอีก 4 listener ที่เหลือ คือ HttpSessionListener, HttpSessionAttributeListner และ HttpSessionActivationListener, HttpSessionBindingListener ก็จะเป็น listener ที่เกี่ยวกับ session โดย 2 อันแรก จะคล้ายกับที่กล่าวมาข้างต้น คือเกี่ยวกับ สร้าง/ทำลาย session และเกี่ยวกับ add, remove, replace ของ session attribute

สำหรับ HttpSessionActivationListener จะเกี่ยวพันถึงการ migrate session ข้าม jvm (สำหรับบางกรณี เช่นการทำ load-balancing) และ HttpSessionBindingListener จะคล้ายกับ HttpSessionAttributeListener แต่ต่างกันที่เป็น listener ที่จะ implement โดย attribute class คือมันจะ notify ที่ attribute ที่ implement มัน เมื่อ attribute นั้นๆ ถูกผูกเข้ากับ session หรือโยนออกจาก session

ซึ่ง listener class ส่วนใหญ่จะต้อง declare ไว้ใน DD (web.xml) ยกเว้น HttpSessionBindingListener ที่ไม่ต้องใส่ไว้ใน DD

ListenerDescriptionmethod
javax.servlet.
ServletContextListener
support event ที่เกี่ยวกับการ initialize และ destroy context หรือเมื่อเรา deploy application เราขึ้นไปบน web container หรือตอนที่ เรา undeploy หรือตอนที่ server start หรือ clash ก็จะมีการเรียก class นี้ไปใช้contextInitialized(ServletContextEvent)
contextDestroyed(ServletContextEvent)
javax.servlet.
ServletContextAttributeListener
ทำงานเมื่อการมี add, remove, replace attribute เข้าไปที่ contextattributeAdded(ServletContextAttributeEvent)
attributeRemoved(ServletContextAttributeEvent)
attributeReplaced(ServletContextAttributeEvent)
javax.servlet.
ServletRequestListener
เมื่อมี request เกิดขึ้น หรือก่อนที่ request จะจบ requestInitialized(ServletRequestEvent)
requestDestroyed(ServletRequestEvent)
javax.servlet.
ServletRequestAttributeListener
เมื่อมีการเปลี่ยนแปลงของ attribute ใน request
attributeAdded(ServletRequestAttributeEvent)
attributeRemoved(ServletRequestAttributeEvent)
attributetReplaced(ServletRequestAttributeEvent)
javax.servlet.http.
HttpSessionListener
เกี่ยวกับ สร้าง/ทำลาย sessionsessionCreated(HttpSessionEvent)
sessionDestroyed(HttpSessionEvent)
javax.servlet.http.
HttpSessionAttributeListner
เกี่ยวกับ add, remove, replace ของ session attributeattributeAdded(HttpSessionBindingEvent)
attributeRemoved(HttpSessionBindingEvent)
attributeReplaced(HttpSessionBindingEvent)
javax.servlet.http.
HttpSessionActivationListener
จะเกี่ยวพันถึงการ migrate session ข้าม jvm (สำหรับบางกรณี เช่นการทำ load-balancing)sessionDidActivate(HttpSessionEvent)
sessionWillPassivate(HttpSessionEvent)
javax.servlet.http.
HttpSessionBindingListener
คล้ายกับ HttpSessionAttributeListener แต่ต่างกันที่เป็น listener ที่จะ implement โดย attribute class คือมันจะ notify ที่ attribute ที่ implement มัน เมื่อ attribute นั้นๆ ถูกผูกเข้ากับ session หรือโยนออกจาก sessionvalueBound(HttpSessionBindingEvent)
valueUnbound(HttpSessionBindingEvent)

Servlet: Class Diagram


สำหรับ parameter ที่ได้รับมาจากแต่ละ reqest method ที่ใช้ก็จะเป็น method ที่อยู่ใน ServletRequest ทั้งหมด ซึ่งมีดังนี้

getParameter(String)
getParameterNames()
getParameterValue(String) - คล้ายกับ getParameter(String) แต่สามารถดึงค่าตัวแปรที่เป็น array ของ String ได้

จะเห็นว่า parameter มีแต่ get method เท่านั้น เราไม่สามารถ set ค่า ให้กับ parameter ได้


Initial parameter

สำหรับ initial parameter ที่กำหนดไว้ใน deployment descriptor ซึ่งมีด้วยกัน 2 ส่วนคือ
  1. ส่วนที่กำหนดไว้ที่ context-param ซึ่งเป็นค่าทุก servlet สามารถนำไปใช้ได้ โดยใช้ method จาก ServletContext getInitParameter(String) หรือ getInitParameterNames()
  2. ส่วนที่กำหนดไว้ที่ init-param ใน servlet จะต้องใช้ ServletConfig getInitParameter(String) method

Attribute

ก่อนหน้านี้เคยสงสัยเหมือนกันว่า parameter มันต่างกับ attribute ตรงไหน ส่วนที่ต่างกันนอกจากเราไม่สามารถ set ค่าให้กับ parameter ได้แล้ว นอกนั้นหลักๆ เลยก็คือ parameter มันเก็บได้เฉพาะค่าที่เป็น String เท่านั้น แต่ attribute สามารถเก็บค่าที่เป็น object ใดๆ ก็ได้

จาก Class Diagram ก็จะเห็นว่า มี method ที่เกี่ยวกับ attribute (setAttribute(String, Object), getAttribute(String), removeAttribute(String), getAttributeName()) อยู่ใน 3 object ซึ่งก็คือ
  1. ServletContext
  2. HttpSession
  3. ServletRequest
นั่นก็หมายความว่า attribute จะอยู่ใน 3 scope คือ application, session และ request ซึ่งก็หมายถึง การเข้าถึง attribute ทั้ง 3 scope จะแตกต่างกันด้วย (นั่นหมายถึงการ ป้องกัน attribute เพื่อให้เป็น thread-safe ก็จะต้องแตกต่างกันด้วย)
  1. application scope - ทุก session ทุก servlet สามารถเข้าถึง attribute นี้ได้ทั้งหมด ดังนั้นถ้าต้องการจะทำให้เป็น thread-safe จะต้อง synchronize ที่ ServletContext เพื่อป้องกัน servlet ตัวอื่นๆ ที่จะเข้าถึงattribute ตัวนี้ได้
  2. session scope - attribute นี้ เข้าถึงได้จาก session เดียวกันเท่านั้น ดังนั้นการทำ thread-safe ก็จะต้อง synchonize ที่ HttpSession เพื่อให้เรียกใช้ตัวแปรใน session นั้นๆ ได้ทีละครั้งเท่านั้น
  3. request scope - ใช้ได้ภายใน request หนึ่งๆ เท่านั้น ตัวนี้เป็น thread-safe อยู่แล้ว ไม่ต้องทำไร สำหรับ servlet ที่ถูกเรียกใช้โดย forward หรือ include จะมี default attribute ซึ่ง container สร้างไว้เลยดังนี้

    ForwardInclude
    javax.servlet.forward.request_urijavax.servlet.include.request_uri
    javax.servlet.forward.context_pathjavax.servlet.include.context_path
    javax.servlet.forward.servlet_pathjavax.servlet.include.servlet_path
    javax.servlet.forward.path_infojavax.servlet.include.path_info
    javax.servlet.forward.query_stringjavax.servlet.include.query_string
    NB. ทั้งนี้เหมือนกับ method ของ HttpServletRequest คือ getRequestURI(), getContextPath(), getServletPath(), getPathInfo(), getQueryString()


Session

สำหรับการจัดการ session Object ที่เราต้องใช้หนักๆ เลยก็คือ HttpSession ซึ่งใน diagram จะ list ไว้เฉพาะ method ที่เราใช้กันบ่อยๆ ไว้แล้ว ส่วน Object อื่นๆ ที่เกี่ยวข้องกับการจัดการ session ก็คือ HttpServletRequest getSession() method ซึ่งที่เกี่ยวกับ session จริงๆ จะมีแค่นี้ค่ะ

โดยปกติแล้ว session จะใช้หลักการส่ง-รับ session id ระหว่าง server กับ client ซึ่งจะต้องใช้ cookie เป็นหลัก ดังนั้นถ้า client disable การับ cookie ไว้ การจัดการ session โดยวิธีนี้ก็จะใช้ไม่ได้ทันที ดังนั้นจะต้องมีวิธีอื่นเพื่อรองรับกรณี นั้นก็คือการ แปะ session id ไปกับ URL ซึ่งเราก็จะใช้ HttpServletResponse encodeURL(String) หรือ encodeRedirectURL(String) ในกรณีที่เป็น redirect URL เพื่อให้ container แปะ session id ให้เราโดยอัตโนมัติ


Cookies

Cookie เป็นส่วนหนึ่งที่ช่วยในการจัดการ session Object ที่เราใช้ก็คือ Cookie ซึ่งใน diagram ก็ list method ที่จะต้องใช้ไว้ให้แล้ว นอกจากนี้ ที่เราจะต้องใช้สำหรับ เพิ่ม cookie และ ดึงค่า cookie มาใช้ก็คือ HttpServletResponse addCookie(Cookie) และ HttpServletRequest getCookies() (ไม่มี method สำหรับการดึง cookie ตัวใดตัวหนึ่งออกมา เราจะต้องใช้การวนค่า array Cookie[] เพื่อดึงค่าที่ต้องการออกมาเอง)

สุดท้ายแถม Servlet Life Cycle ให้ฮับ


สำหัรบ HttpServlet service() method จะเรียก doGet(), doPost, etc. แ้ล้วแต่ request ที่ำได้รับยกเว้น CONNECT method ซึ่ง HttpServlet ไม่ support

Reference:
Web Application FAQ

Servlet: Deployment Descriptor (DD)

DD ก็คือ XML ไฟล์ที่กำหนดการ deploy Servlet สำหรับ Web Container หรือ DD ก็คือ web.xml นะเอง

ตัวอย่างของ DD อย่างง่ายๆ
<web-app version="2.4"
xmlns="http://java.sun.com/xml/ns/j2ee"
xmlns:xsi="http://www.w3.org/2001/XMLSchema-instance"
xsi:schemaLocation="http://java.sun.com/xml/ns/j2ee
http://java.sun.com/xml/ns/j2ee/web-app_2_4.xsd">

  <context-param>
    <param-name>param</param-name>
    <param-value>parameter value</param-value>
  </context-param>
  [ <context-param> ...parameter name-value pair as above... </context-param> ]

  <listener>
    <listener-class>package.class</listener-class>
  </listener>

  <session-config>
    <session-timeout>10</session-timeout>
  </session-config>

  <servlet>
    <servlet-name>Internal Name</servlet-name>
    <servlet-class>package.ServletClass</servlet-class> | <jsp-file>path/file.jsp</jsp-file>
    <load-on-startup>1<load-on-startup/>

    <init-param>
      <param-name>param</param-name>
      <param-value>parameter value</param-value>
    </init-param>
    [ <init-param> ...parameter name-value pair... <init-param> ]...

    <security-role-ref>
      <role-name>Manager</role-name>
      <role-link>Admin</role-line>
    </security-role-ref>
  </servlet>

  <servlet-mapping>
    <servlet-name>Internal Name</servlet-name>
    <url-pattern>/Public.do</url-pattern>
  </servlet-mapping>

  <jsp-config>
    <jsp-property-group>
      <url-pattern>*.jsp</url-pattern>
      <el-ignored>[ true | false ]</el-ignored>
      <scripting-invalid>[ true | false ]</scripting-invalid>
    </jsp-property-group>

    <taglib>
      <taglib-uri>randomThing</taglib-uri>
      <taglib-location>/WEB-INF/myFunctions.tld</taglib-location>
    </taglib>
  </jsp-config>

  <!-- filter config -->
  <filter>
    <filter-name>LogRequest</filter-name>
    <filter-class>package.Filter</filter-class>

    <init-param>
      <param-name>param</param-name>
      <param-value>parameter value</param-value>
    </init-param>
    [ <init-param> ...parameter name-value pair... <init-param> ]...
  </filter>

  <filter-mapping>
    <filter-name>LogRequest</filter-name>
    <url-pattern>/path/*</url-pattern> | <servlet-name>AnyRequest</servlet-name>
    <dispatcher> REQUEST | INCLUDE | FORWARD | ERROR </dispatcher>
    [ <dispatcher> REQUEST | INCLUDE | FORWARD | ERROR </dispatcher> ]...
  </filter-mapping>

  <!-- declare welcome file -->
  <welcome-file-list>
    <welcome-file>index.html</welcome-file>
    [ <welcome-file>index.html</welcome-file> ]...
  </welcome-file-list>

  <!-- declare to catch all error, but you can change to catch only some exceptions -->
  <error-page>
    <exception-type>java.lang.Throwable</exception-type>
    <location>/ErrorPage.jsp</location>
  </error-page>

  <!-- This is another way to catch error by status code -->
  <error-page>
    <error-code>404</error-code>
    <location>/ErrorNotFound.jsp</location>
  </error-page>

  <!-- external resource related -->
  <resource-env-ref>
    <resource-env-ref-name>jms/StockQueue</resource-env-ref-name><resource-env-ref-type>javax.jms.Queue</resource-env-ref-type>
</resource-env-ref>
  <resource-ref>
    <res-ref-name>ECC</res-ref-name>
    <res-type>javax.sql.DataSource</res-type>
    <res-auth> APPLICATION | CONTAINER </res-auth>
    <res-sharing-scope> Shareable | Unshareable </res-sharing-scope>
  </resource-ref>

  <!-- EJB related -->
  <ejb-local-ref>
    <ejb-ref-name>JNDI lookup name (such as ejb/Customer)</ejb-ref-name>
    <ejb-ref-type> Entity | Session </ejb-ref-type>
    <local-home>package.Class</local-home>
    <local>package.Class</local>
  </ejb-local-ref>

  <ejb-ref>
    <ejb-ref-name>JNDI lookup name (such as ejb/Customer)</ejb-ref-name>
    <ejb-ref-type> Entity | Session </ejb-ref-type>
    <home>package.Class</home>
    <remote>package.Class</remote>
  </ejb-ref>

  <env-entity>
    <env-entry-name>JNDI lookup name (such as rates/discountRate)</env-entry-name>
    <env-entry-type>java.lang.Integer</env-entry-type>
    <env-entry-value>10<env-entry-value>
  </env-entity>

  <!-- mine-type mapping -->
  <mime-mapping>
    <extension>mgp</extension>
    <mime-type>video/mpeg</mime-type>
  </mime-mapping>

  <!-- constraint resource -->
  <security-constraint>

    <web-resource-collection>
      <web-resource-name>some name</web-resource-name>
      <description>explain about tht resource</description>
      <url-pattern>/Public.do</url-pattern>
      [ <url-pattern>/Path/resource</url-pattern> ]...

      <http-method>GET | POST | PUT | TRACE | DELETE | HEAD | OPTION</http-method>
      [ <http-method>GET | POST | PUT | TRACE | DELETE | HEAD | OPTION</http-method> ]...
    </web-resource-collection>

    <auth-constraint>
      <role-name>Admin</role-name>
      [ <role-name>Others</role-name> ]...
    </auth-constraint>

    <user-data-constraint>
      <transport-guarantee> NONE | INTEGRAL | CONFIDENTIAL </transport-guarantee>
    </user-data-constraint>
  </security-constraint>

  <!-- authorization path to define role -->
  <security-role><role-name>Admin</role-name></security-role>
  [ <security-role><role-name>Admin</role-name></security-role> ]...

  <login-config>
    <auth-method>BASIC | DIGEST | CLIENT-CERT | FORM</auth-method>
    <form-login-config>
    <form-login-page>/loginPage.html</form-login-page>
    <form-error-page>/loginPage.html</form-error-page>
    </form-login-config>
  </login-config>

</web-app>

context-param เป็นค่าที่กำหนดไว้สำหรับทั้ง application
listener เป็นตัวกำหนดว่าใน application ของเรามี listener อะไรบ้าง


Servlet Configuration

session-timeout กำหนดระยะเวลาที่ session inactive กี่นาที ก่อนจะหลุด session จากตัวอย่างข้างบน คือ ถ้า session inactive 10 นาที ก็จะหลุด ถ้าใส่ 0 หมายถึงให้ time out ทันมี (เสมือนเรียก HttpSession invalidate())
servlet-name ใน servlet เป็นชื่อที่ใช้ใน DD เพื่อเชื่อกับ servlet-name ใน servlet-mappping
servlet-class เป็น Servlet class ที่เราเขียนขึ้นมาเพื่อให้มัน process อะไรสักอย่างสำหรับเวปเรา
jsp-file เป็นชื่อไฟล์ jsp ที่เราต้องการใส่แทน servlet class โดยปกติ jsp สามารถแสดงผลได้โดยไม่ต้องใ่ส่ใน deployment descriptor ก็ได้ แต่เราจะใส่ในกรณีที่เราต้องการ config เพิ่มเติม เช่นต้องการกำหนดค่า init-param แต่ในกรณีที่เราเขียน jsp-file tag แล้ว จะต้องไ่ม่มี servlet-class tag อีก
load-on-startup เป็นการบอกว่าจะให้ servlet นั้นๆ ทำการ load ตั้งแต่ตอน deploy หรือไม่ (เพื่อเป็นการย่นระยะเวลาในการเรียกใช้ของผู้ใช้ในครั้งแรก)

init-param เป็นค่าที่กำหนดไว้สำหรับ servlet นั้นๆ ซึ่งสามารถมี init-param tag ได้มากกว่า 1 ตัวสำหรับหลายๆ parameter

servlet-mapping กำหนดค่ารูปแบบ url ที่จะใช้เรียก servlet ซึ่งลำดับในการ map จะใช้เป็น exact match (คือจะต้องถูกต้องตรงกับ url-pattern ทั้งหมด), directory match (เช่น url-pattern เป็น /test/*) สุดท้ายคือ extension match (เช่น *.do)
url-pattern เป็น URL pattern สำหรับ คนภายนอกที่จะเรียกใช้ ทั้งนี้เราสามารถเขียนเป็น pattern ซึ่งทุก URL ที่ตรงกับ pattern ที่กำหนดจะใช้ Servlet class ตัวเดียวกัน

JSP Configuration

el-ignored กำหนดให้ EL ทำงานหรือไม่ ถ้าเป็น true คือไ่ม่ให้ทำงาน
scripting-invalid กำหนดให้ JSP สามารถใส่ scriptlet ได้หรือไม่

taglib เป็นการกำหนด location ของ Tag Library Descriptor ซึ่งใช้สำหรับก่อน JSP 2.0 ซึ่งจำเป็นต้องบอก location ที่ให้กับ web container แต่ตั้งแต่ JSP 2.0 เป็นต้นไป ไม่จำเป็นต้องมากำหนดใน DD แล้ว web container สามารถหาได้จากการ map ไฟล์ .tld ทุกไฟล์ที่อยู่ใน WEB-INF รวมถึง META-INF ใน jar ไฟล์ แต่ถ้ามีการกำหนดค่าไว้ใน DD และถึงแม้จะเป็น JSP 2.0 web container ก็จะใช้ตัวที่กำหนดไว้ใน DD เท่านั้น

Filter Configuration

Web container จะเรียง filter ตามลำดับที่ปรากฎใน Deployment descriptor โดยจะเลือกที่ map โดย url-pattern ก่อน servlet-name

Error Configuration
exception-type เป็น Class ที่ต้องการจะดักเพื่อให้ redirect ไปยัง error page
error-code นอกจากจะดักเป็น Exception class แล้ว ก็สามารถดักเป็น status code ได้
location เป็น relative location ของ error page

EJB Configuration

env-entry-type จะต้องเป็น Class เท่านั้น เป็น primitive type ไม่ได้

Security Configuration

ส่วนนี้เป็นแยกเป็นส่วนที่เกี่ยวกับ Authorization และ Authentication ซึ่งจะต้องใช้ร่วมกับ web container แต่ละตัว ซึ่งแต่ละียี่ห้อก็จะแตกต่างกัน เช่น Tomcat ใช้การ config ไว้ที่ไฟล์ conf/tomcat-users.xml

ส่วนที่เกี่ยวกับ Authorization จะเป็นการกำหนดว่า resource ไหน จะถูกจำกัดด้วย role ใด โดยวีธีใดบ้าง

security-constraint เป็นส่วนที่กำหนดว่า resources หรือไฟล์ไหนและ method ไหนบ้างที่จะต้องมี constraint กำหนดไว้ เช่น
url-pattern เป็น resource ที่ถูกกำหนดว่าจะต้องมี constraint ซึ่ง กำหนดเป็นไฟล์ใดไฟล์หนึ่ง หรือว่ากำหนดเป็น path ก็ได้ (ในกรณีนี้จะเป็น /path/*) หรือกำหนดเป็น pattern เช่น /path/*.do ก้ได้ แต่อย่างไรก็ตามจะต้องกำหนดอย่างน้อย 1 resouce
auth-contraint เป็นตัวกำหนดว่า resource เหล่านี้จะมี constraint ที่ method ไหนบ้าง ซึ่งจะใช้ได้กับทั้ง resource ใน web-resource-collection

ส่วนถัดมาเป็น Authentication เป็นส่วนกำหนดว่าจะมี role ในบ้าน โดยวีธีการ authentication แบบใด
security-role และ role-name เป็นตัวกำหนดว่าจะมี role อะไรบ้าง

สำหรับโครงสร้างในการ deploy web application จะเป็นดังนี้


Reference: